With the success of the recent Spiderman Into the Spiderverse, animating on 2’s is becoming quite trendy. While it is quite an easy technique to do when the camera is not moving, it can become an horrible mess when the camera is moving and you do not know how to deal with it. There is a nice tuto on Youtube on how to perform this kind of things but it relies on a plug-in (which is not free). On multiple occasions, Sony Pictures’ animators talked about what they did (during a Production Sessions at SIGGRAPH LA 2019 or in an article from SideFX for example) and it’s not a super hard trick, but it’s pretty convenient to know. My goal here is to give a few details so that we understand exactly what happens.
Note: this article involves some extremely basic Python scripting. I will explain really in details so even if you are an absolute beginner in scripting it might be understandable! Oh, and it is done in Maya also. But that should not really be that different from one 3D software to another 😉
First, what is animating on two’s?
Animating on 2’s is a technique used in Spiderverse as I said earlier, but you can find it a lot in traditional and Japanese animation. It consists on drawing only one frame every 2 frame. When the framerate is usually 24 fps, it means that we will have only 12 frame every second. However, it is not just a downgrade in the framerate. Most of the time, the camera still continue to move in 1’s (so keep the 24 fps rate), but the character move on 2’s.

Let’s go hands-on
For the sake of this explanation I will use an old walk cycle that I did a few months ago. I animated in 1’s so we will first need to put it in 2’s (*)! We will see what is the problem with the camera work and how to fix it.
So, according to what I said before (and the figure explains it well), you just need to remove one frame every 2 frames. However, most of the time, we don’t put keyframes on EVERY frame and on every controller, we often rely on interpolation. An easy way to deal with that problem is to use the ‘bake keys’ function (**).
- Select ALL the controllers of your character
- Go in Key/Bake Simulation (if you do not have the tab Key, change your mode to “Animation”)

Ok, so what did it do? Basically, it just went through all your animation and put keys everywhere. So your animation is in 1’s exactly like in the picture from last paragraph. Ok, so now, we need to put it in 2’s. You could just manually remove delete a keyframe every 2 frames (***); it works but that’s really boring and somehow long. We can use a basic Python script for that. The role of a script is to give instructions to the software so that it can perform repetitive tasks at your place (and then, really fast).
First, select all your controllers (you need to make sure all your controllers will still be selected when running the script), then, open your Script Editor. Start coding:
import maya.cmds as cmds
import maya.mel

selection = cmds.ls(sl=1) #selection is exactly supposed to store what you have selected
frameStart=0 #the first frame of your animation, in my case it is 0
frameEnd=130 #the last frame of your animation, in my case it is 130
for t in range(frameStart,(frameEnd-frameStart)//2): #for every frame in the animation
    cmds.currentTime(2*t+1) #I go to every odd frame
    maya.mel.eval('timeSliderClearKey') #and suppress the keys
Ok, everything is written in the comments but let me just explain real quick. The first two lines is just for preparing your software (your Python interpreter to be more precise) that you will use some of Maya functions. In the next block, the first line is for saying that the variable ‘selection’ contains what you have selected (i.e all your controllers if you did what I told). Then, you go through every frame of your animation (2*t are the even frames, and 2*t+1 are the odd ones) and deleteKeys of the odd frames. And that’s all!
Let’s take a look! I first show the animation on 1’s, without camera motion, then with camera motion. Then I show the same animations on 2’s.
(*) Animating in 2’s by taking an animation in 1’s and ‘downgrading it’ is pretty much a bad idea. If you want to animate in 2’s, you need to think in 2’s. The thinking process about the overall dynamics might be the same but you also might have considerations like finding stronger poses, techniques you would use-smears if one to mention- and when to put them, even before animating. But I still do that for educative purpose-and because I do not have enough time and enough skills to do a full animation in 2’s quickly.
(**) If you know a little bit what’s happening in Maya, you don’t want to use that, since it will be very slow. Better work directly with the animation curves so that you don’t have to use anything that update the time and evaluate all the nodes all the time. But the code is way more basic and clear written that way 😉
(***) Removing the odd frames is probably not optimal and somehow arbitrary. What if my keypose is on the odd frame and the frame just before (and after) are just inbetweens? My animation will definitely lose some impact. Part of my research is dedicated to give a relative importance to frames so that might give better practices for that point.
IT’S HORRIBLE, WHAT HAPPENED??
The animation, without the camera movement seems OK though, there is that choppy style which is characteristic of animations on 2’s. But when there is the camera movement it is really really bad. The character is giggling and it’s annoying to watch. So what’s happening exactly?

It creates a back and forth movement since the duck is late/right timing/late/right timing/late… again and again and again, and that’s really uncomfortable to watch.
Since our camera is moving the correct way, but not our duck (or our Spinosaurus), no wonder why our movement looks strange, especially with that back and forth. But why does it work in Japanese animation for example?
Check this example. The movement of the camera is crazy, too crazy, the character is obviously not on 1’s but that’s still working and not only that, but the result is extremely fluid and really cool. If you go frame by frame or just scroll slowly the time bar, you will notice that the character is locked on screen. During their presentation at SIGGRAPH, Sony’s animators were using a formulation like ‘pixel locked’: on the frame that our character does not move, it still needs to remain at exactly the same pixels on camera, even though the camera changes! In 2D it’s a natural thing to do but not in 3D!
Let’s pixel lock our character: First Attempt
So, how can we do that? First answer would be, ‘you want to lock my camera on screen? Then, just constrain the character to the camera!’ That’s a fair and simple answer, let’s try!
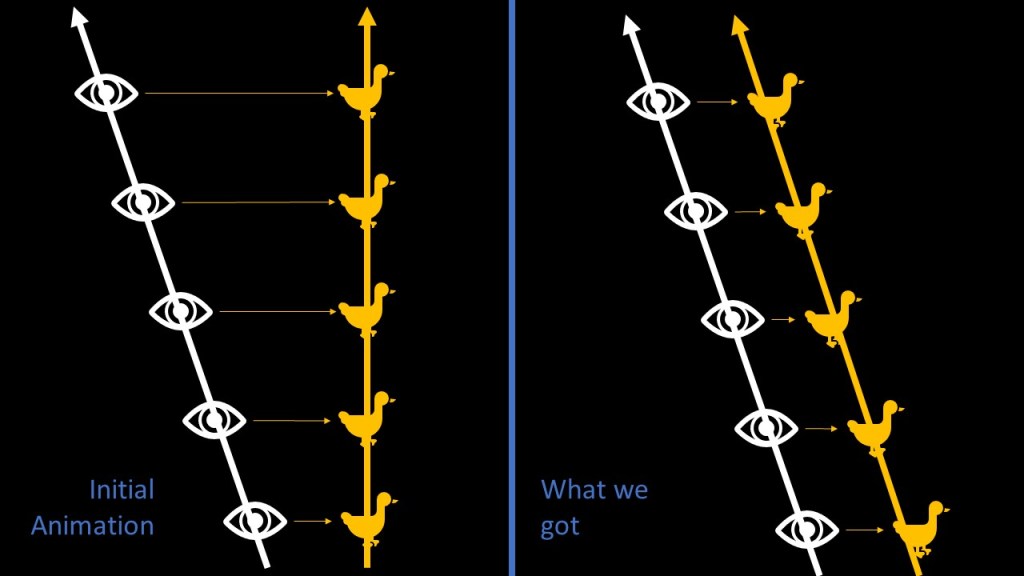
That looks good! But is it what we want? Definitely no!
We lost the movement of our camera!! If you watch the initial animation, the camera gets further and further away from our character! Here, the animation is locked, but in the initial position of the animation!
Constraining is not dumb, but what we should do is to apply multiple constraints! One every two frames to be precise. Here is how we should do it:

Second (and last) Attempt
Now, we somehow understand what we have to do. We should just move our character ONLY on the frames they’re not changing (every odd ones for examples), and by the right amount so that they’re locked on screen.
Setting tons of constraints is a boring idea, so we will do a quick and efficient script instead.. But first let’s just check how we need to move our character to lock them.

Here is the Python code (don’t worry too much about the add function, I’m using numpy for computations but you probably won’t have that installed in your Maya so I needed to get a quick solution)
import maya.cmds as cmds #import the maya functions

#we create a function add to add/substract lists such that: (a,b,c)+(1,2,3)=(a+1,b+2,c+3)
def add(list1,list2,substraction=False):
    if(len(list1)!=len(list2)):
        print('Not same length!')
    coeff=1.
    if substraction:
        coeff=-1.
    for i in range(len(list1)):
        list1[i]+=coeff*list2[i]
    return list1

cameraName='camera2' #we get the name of our camera
selected = cmds.ls(sl=1) #select the MAIN or root of your character

for t in range(65): #it was 65 in my case, (frameEnd-frameStart)//2 for you
    cmds.currentTime(2*t) #we go to the even frame
    original_cam_transform=cmds.xform(cameraName,q=True,ws=True,t=True) #to check the position of the camera

    cmds.currentTime(2*t+1) #we go to the odd frame
    new_cam_transform=cmds.xform(cameraName,q=True,ws=True,t=True) #we get the new position
    translation = add(new_cam_transform,original_cam_transform,True) #we calculate the difference ie the amount the camera moved

    selected_transform=cmds.xform(selected,q=True,ws=True,t=True) #we get the current value of our selection
    new_selected_transform=add(selected_transform,translation) #we move it by the amount the camera moved
cmds.xform(selected,ws=True,t=new_selected_transform) #we give this value to our selectionNote: If you look at the code closely, you will notice that I only work the translations! In my scene I only have translations so I did not need to care about if the camera rotates or not. But it is not way more complicated, you would just need to work with Transformation Matrices rather than just adding stuff, it is way more clear written only with translations. Reach out to me if you need to do some rotatoes 😉
So, here is the final result:
Of course there are tons of other things to do to improve the results (selecting the keyframes more cleverly or PLANNING to animate in 2’s from the start) But I hope you got the idea! Just lock your character in screen on the freezed frames!
This is not the only way of achieving that! You can for example try, during the rendering, to get separate AOVs for the objects and the background and keep only 1/2 frame for the objects that will be in 2’s.
The advantage of the technique I described is that it is more flexible: by tweeking the code you can choose on which frame you want to apply the pixel lock (so that you can easily choose where you want to animate on 2’s or on 1’s if you want to mix the styles!)
